
IN THIS SECTION
Overview
The Dashboard shows key metrics for your companies in simple-to-view chart widgets. You can create multiple Dashboards, each one is personal to you. On each dashboard you can add, configure and re-arrange widgets so that they information you need is presented in the way you require.
On each widget you can choose from a set of metrics and choose which companies to display metrics for and for which period and also compare against previous periods and budgets. There is also a Text Widget where you can enter free-form text, format the text as required and add hyperlinks to external resources.
To view the Dashboard just click on the Dashboard item in the left-hand menu.
Managing Dashboards
When you first visit the Dashboard page you will be presented with a single default Dashboard.
To add a new dashboard
Click on the name of the Dashboard at the top left and click the Add Dashboard button. You will be asked to enter a name for your dashboard. Enter a name and click Create and the new dashboard will be created containing the default widgets. From there you can add, remove, configure and rearrange widgets as required.
When creating a new dashboard you can also choose to start with a blank dashboard (no widgets) or include the default widgets.
To clone a dashboard
Click on the name of the Dashboard at the top left to display the list of dashboards. Click on the the three dot menu next to the dashboard you wish to clone and select the Clone option. A copy of the dashboard will be made. From there you can add, remove, configure and rearrange widgets as required.
To edit the name of a dashboard
Click on the Edit icon at the top left of the dashboard to edit the name of the dashboard. Enter the new name and click the Apply changes button.
To bulk change widget properties
To change the properties across all the widgets on a Dashboard, click on the Edit icon at the top left of the dashboard.
You can set the Company, Currency, Period, Start Date, End Date and Elimination Method and the settings you apply here will be applied to all the widgets on the Dashboard. Click on Apply Settings to save the settings.
Once set you can override the settings on individual widgets by setting them on each widget as described in this article.
Reset the dashboard to default
You can reset a dashboard so that it contains the default widgets.
Click on the name of the Dashboard at the top left to display the list of dashboards. Click on the three dot menu on the right of the dashboard you wish to reset and select the Reset option.
NOTE: When you reset a dashboard the default widgets will be configured to include all companies you have connected in Joiin.
To delete a dashboard
Click on the name of the Dashboard at the top left to display the list of dashboards. Click on the three dot menu on the right of the dashboard you wish to delete and select the Delete option.
Sharing dashboards
You can share your dashboard with other team members. Click on the Share button at the top right to do this. When you click on the button you can choose to share with everyone (all users) or with individual team members. You can also choose to allow users to Edit the dashboard or to View only.
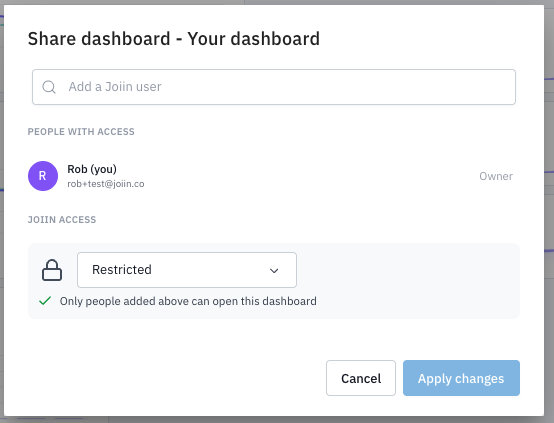
Sharing with individual users
At the top, a list of people currently with access will be shown - if you have not shared before this will only include you, as the owner. You can search for users by typing in the box at the top. A list of all Joiin users, teammates and will be displayed.
NOTE: Who you can share with depends on your Joiin user role. See the user management roles article for more information.
Select one to add to the list of people with access - the user will be added and you can then select from the dropdown to the right whether they have View or Edit access. You can also remove the access from this dropdown by select Remove.
Sharing with everyone in the account
As well as sharing to individual users and external users you can also set a report pack so it is automatically accessible to all the users in your Joiin account.
In the bottom, Joiin Access, section you can choose from two options.
Restricted - only you and any users you have specified in the top section will have access.
Everyone in this account - all Joiin users (for that client - i.e. all users in the User Management screen) will have access - you can additionally set whether they have View or Edit access
Adding Widgets
You can add a new widget to a chart by clicking on the Create New Widget button. This brings up a list of widgets to be added. There are a variety of built-in Widgets available, categorised under Revenue, Expenses, Profitability etc. The widgets are described in more detail below.
Change Widget layout
You can change the position and size of each widget. To reposition a widget simply drag and drop it to where you want it. To resize a widget grab the bottom right corner with your mouse and resize it. Other widgets will move automatically as you reposition and resize a widget.
Undo/Redo Widget layout
You can reverse or redo the changes you made to the widget layout by clicking on the Undo and Redo buttons at the top. Each time you click on the buttons it steps back or forward through the previous layout changes.
The Chart Widgets
See this article for details on the how to manage the Chart Widgets.
Editing Text Widgets
The Text Widget is different to the chart widgets in that it just displays a block of text. This can be helpful for adding commentary to a dashboard etc. You enter the text you require into the box and click Save once done. The text can be formatted in a variety of ways using the formatting ribbon.
Copying Widgets
You can copy an existing widget and create a new widget by clicking on the Copy icon at the top right of any widget. The new widget will be created after the last widget on the dashboard and can then be moved to the desired position.